LnRiLWdyaWQsLnRiLWdyaWQ+LmJsb2NrLWVkaXRvci1pbm5lci1ibG9ja3M+LmJsb2NrLWVkaXRvci1ibG9jay1saXN0X19sYXlvdXR7ZGlzcGxheTpncmlkO2dyaWQtcm93LWdhcDoyNXB4O2dyaWQtY29sdW1uLWdhcDoyNXB4fS50Yi1ncmlkLWl0ZW17YmFja2dyb3VuZDojZDM4YTAzO3BhZGRpbmc6MzBweH0udGItZ3JpZC1jb2x1bW57ZmxleC13cmFwOndyYXB9LnRiLWdyaWQtY29sdW1uPip7d2lkdGg6MTAwJX0udGItZ3JpZC1jb2x1bW4udGItZ3JpZC1hbGlnbi10b3B7d2lkdGg6MTAwJTtkaXNwbGF5OmZsZXg7YWxpZ24tY29udGVudDpmbGV4LXN0YXJ0fS50Yi1ncmlkLWNvbHVtbi50Yi1ncmlkLWFsaWduLWNlbnRlcnt3aWR0aDoxMDAlO2Rpc3BsYXk6ZmxleDthbGlnbi1jb250ZW50OmNlbnRlcn0udGItZ3JpZC1jb2x1bW4udGItZ3JpZC1hbGlnbi1ib3R0b217d2lkdGg6MTAwJTtkaXNwbGF5OmZsZXg7YWxpZ24tY29udGVudDpmbGV4LWVuZH0gLndwdi12aWV3LW91dHB1dFtkYXRhLXRvb2xzZXQtdmlld3Mtdmlldy1lZGl0b3I9IjI4MTRiMDY5ZjE2ZjQ5YTI2NGU2ZDQyNTQ5OWU4NTgzIl0gPiAudGItZ3JpZC1jb2x1bW46bnRoLW9mLXR5cGUoM24gKyAxKSB7IGdyaWQtY29sdW1uOiAxIH0gLndwdi12aWV3LW91dHB1dFtkYXRhLXRvb2xzZXQtdmlld3Mtdmlldy1lZGl0b3I9IjI4MTRiMDY5ZjE2ZjQ5YTI2NGU2ZDQyNTQ5OWU4NTgzIl0gPiAudGItZ3JpZC1jb2x1bW46bnRoLW9mLXR5cGUoM24gKyAyKSB7IGdyaWQtY29sdW1uOiAyIH0gLndwdi12aWV3LW91dHB1dFtkYXRhLXRvb2xzZXQtdmlld3Mtdmlldy1lZGl0b3I9IjI4MTRiMDY5ZjE2ZjQ5YTI2NGU2ZDQyNTQ5OWU4NTgzIl0gPiAudGItZ3JpZC1jb2x1bW46bnRoLW9mLXR5cGUoM24gKyAzKSB7IGdyaWQtY29sdW1uOiAzIH0gLndwdi12aWV3LW91dHB1dFtkYXRhLXRvb2xzZXQtdmlld3Mtdmlldy1lZGl0b3I9IjI4MTRiMDY5ZjE2ZjQ5YTI2NGU2ZDQyNTQ5OWU4NTgzIl0gLmpzLXdwdi1sb29wLXdyYXBwZXIgPiAudGItZ3JpZCB7IGdyaWQtdGVtcGxhdGUtY29sdW1uczogbWlubWF4KDAsIDAuMzMzM2ZyKSBtaW5tYXgoMCwgMC4zMzMzZnIpIG1pbm1heCgwLCAwLjMzMzNmcik7Z3JpZC1hdXRvLWZsb3c6IHJvdyB9IC53cHYtcGFnaW5hdGlvbi1wcmV2aW91cy1uZXh0LWJ1dHRvbnNbZGF0YS10b29sc2V0LXZpZXdzLXZpZXctcGFnaW5hdGlvbi1ibG9jaz0iNjZmYzU2NzBmYTg2ZjBjMmJlMDE1ZDBmMzFlMWFhNjMiXSB7IHRleHQtYWxpZ246IHJpZ2h0O3RleHQtYWxpZ246IHJpZ2h0OyB9IC50Yi1jb250YWluZXIgLnRiLWNvbnRhaW5lci1pbm5lcnt3aWR0aDoxMDAlO21hcmdpbjowIGF1dG99IC53cC1ibG9jay10b29sc2V0LWJsb2Nrcy1jb250YWluZXIudGItY29udGFpbmVyW2RhdGEtdG9vbHNldC1ibG9ja3MtY29udGFpbmVyPSJkMzA2Mjc1NDM4ZGVhODNmY2JlOTg2OWRmNzU2Y2YwOSJdIHsgYm9yZGVyLXJhZGl1czogMjBweDtwYWRkaW5nOiAwcHg7bWFyZ2luOiAwcHggMjBweCAwcHggMjBweDtib3gtc2hhZG93OiAwIDAgMTBweCAzcHggcmdiYSggMCwgMCwgMCwgMC4xICk7bWluLWhlaWdodDogNTAwcHg7IH0gLnRiLWNvbnRhaW5lciAudGItY29udGFpbmVyLWlubmVye3dpZHRoOjEwMCU7bWFyZ2luOjAgYXV0b30gLndwLWJsb2NrLXRvb2xzZXQtYmxvY2tzLWNvbnRhaW5lci50Yi1jb250YWluZXJbZGF0YS10b29sc2V0LWJsb2Nrcy1jb250YWluZXI9ImU2NzQ2YjBhNjA0MGUzYjFlZTJhODVjNTNiNDc1N2Y5Il0geyBwYWRkaW5nOiAxNXB4IDI1cHggMTVweCAyNXB4OyB9IC50Yi1jb250YWluZXIgLnRiLWNvbnRhaW5lci1pbm5lcnt3aWR0aDoxMDAlO21hcmdpbjowIGF1dG99IC53cC1ibG9jay10b29sc2V0LWJsb2Nrcy1jb250YWluZXIudGItY29udGFpbmVyW2RhdGEtdG9vbHNldC1ibG9ja3MtY29udGFpbmVyPSI2ZDY2N2ZjYWJjNTM5ZDY4NDVjNjRjN2FlY2QwZmQyYiJdIHsgYm9yZGVyLXJhZGl1czogMTlweCAxOXB4IDAgMDtiYWNrZ3JvdW5kOiB1cmwoJ2h0dHBzOi8vbGFic3RhdHMuY29tL3dwLWNvbnRlbnQvdXBsb2Fkcy8yMDIyLzA1L2hhcHB5dGVhbS5qcGcnKSBjZW50ZXIgY2VudGVyIG5vLXJlcGVhdDtiYWNrZ3JvdW5kLXNpemU6Y292ZXI7cGFkZGluZzogMHB4O21pbi1oZWlnaHQ6IDE3NXB4OyB9IC50Yi1jb250YWluZXIgLnRiLWNvbnRhaW5lci1pbm5lcnt3aWR0aDoxMDAlO21hcmdpbjowIGF1dG99IC53cC1ibG9jay10b29sc2V0LWJsb2Nrcy1jb250YWluZXIudGItY29udGFpbmVyW2RhdGEtdG9vbHNldC1ibG9ja3MtY29udGFpbmVyPSIzNjAxNjcwMGViZjhmNzAyMzIyZjc1OGU2MTg1YTkyOCJdIHsgYm9yZGVyLXJhZGl1czogMjBweDtiYWNrZ3JvdW5kOiB1cmwoJ2h0dHBzOi8vbGFic3RhdHMuY29tL3dwLWNvbnRlbnQvdXBsb2Fkcy8yMDIxLzAxL3RlYWNoaW5nd2VhcmluZ2FtYXNrLmpwZycpIGNlbnRlciBjZW50ZXIgbm8tcmVwZWF0O2JhY2tncm91bmQtc2l6ZTpjb3ZlcjtwYWRkaW5nOiAyNXB4O21pbi1oZWlnaHQ6IDM5N3B4OyB9IEBtZWRpYSBvbmx5IHNjcmVlbiBhbmQgKG1heC13aWR0aDogODAwcHgpIHsgLnRiLWdyaWQsLnRiLWdyaWQ+LmJsb2NrLWVkaXRvci1pbm5lci1ibG9ja3M+LmJsb2NrLWVkaXRvci1ibG9jay1saXN0X19sYXlvdXR7ZGlzcGxheTpncmlkO2dyaWQtcm93LWdhcDoyNXB4O2dyaWQtY29sdW1uLWdhcDoyNXB4fS50Yi1ncmlkLWl0ZW17YmFja2dyb3VuZDojZDM4YTAzO3BhZGRpbmc6MzBweH0udGItZ3JpZC1jb2x1bW57ZmxleC13cmFwOndyYXB9LnRiLWdyaWQtY29sdW1uPip7d2lkdGg6MTAwJX0udGItZ3JpZC1jb2x1bW4udGItZ3JpZC1hbGlnbi10b3B7d2lkdGg6MTAwJTtkaXNwbGF5OmZsZXg7YWxpZ24tY29udGVudDpmbGV4LXN0YXJ0fS50Yi1ncmlkLWNvbHVtbi50Yi1ncmlkLWFsaWduLWNlbnRlcnt3aWR0aDoxMDAlO2Rpc3BsYXk6ZmxleDthbGlnbi1jb250ZW50OmNlbnRlcn0udGItZ3JpZC1jb2x1bW4udGItZ3JpZC1hbGlnbi1ib3R0b217d2lkdGg6MTAwJTtkaXNwbGF5OmZsZXg7YWxpZ24tY29udGVudDpmbGV4LWVuZH0gLndwdi12aWV3LW91dHB1dFtkYXRhLXRvb2xzZXQtdmlld3Mtdmlldy1lZGl0b3I9IjI4MTRiMDY5ZjE2ZjQ5YTI2NGU2ZDQyNTQ5OWU4NTgzIl0gPiAudGItZ3JpZC1jb2x1bW46bnRoLW9mLXR5cGUoM24gKyAxKSB7IGdyaWQtY29sdW1uOiAxIH0gLndwdi12aWV3LW91dHB1dFtkYXRhLXRvb2xzZXQtdmlld3Mtdmlldy1lZGl0b3I9IjI4MTRiMDY5ZjE2ZjQ5YTI2NGU2ZDQyNTQ5OWU4NTgzIl0gPiAudGItZ3JpZC1jb2x1bW46bnRoLW9mLXR5cGUoM24gKyAyKSB7IGdyaWQtY29sdW1uOiAyIH0gLndwdi12aWV3LW91dHB1dFtkYXRhLXRvb2xzZXQtdmlld3Mtdmlldy1lZGl0b3I9IjI4MTRiMDY5ZjE2ZjQ5YTI2NGU2ZDQyNTQ5OWU4NTgzIl0gPiAudGItZ3JpZC1jb2x1bW46bnRoLW9mLXR5cGUoM24gKyAzKSB7IGdyaWQtY29sdW1uOiAzIH0gLndwdi12aWV3LW91dHB1dFtkYXRhLXRvb2xzZXQtdmlld3Mtdmlldy1lZGl0b3I9IjI4MTRiMDY5ZjE2ZjQ5YTI2NGU2ZDQyNTQ5OWU4NTgzIl0gLmpzLXdwdi1sb29wLXdyYXBwZXIgPiAudGItZ3JpZCB7IGdyaWQtdGVtcGxhdGUtY29sdW1uczogbWlubWF4KDAsIDAuMzMzM2ZyKSBtaW5tYXgoMCwgMC4zMzMzZnIpIG1pbm1heCgwLCAwLjMzMzNmcik7Z3JpZC1hdXRvLWZsb3c6IHJvdyB9IC50Yi1jb250YWluZXIgLnRiLWNvbnRhaW5lci1pbm5lcnt3aWR0aDoxMDAlO21hcmdpbjowIGF1dG99LnRiLWNvbnRhaW5lciAudGItY29udGFpbmVyLWlubmVye3dpZHRoOjEwMCU7bWFyZ2luOjAgYXV0b30udGItY29udGFpbmVyIC50Yi1jb250YWluZXItaW5uZXJ7d2lkdGg6MTAwJTttYXJnaW46MCBhdXRvfS50Yi1jb250YWluZXIgLnRiLWNvbnRhaW5lci1pbm5lcnt3aWR0aDoxMDAlO21hcmdpbjowIGF1dG99IH0gQG1lZGlhIG9ubHkgc2NyZWVuIGFuZCAobWF4LXdpZHRoOiA1OTlweCkgeyAudGItZ3JpZCwudGItZ3JpZD4uYmxvY2stZWRpdG9yLWlubmVyLWJsb2Nrcz4uYmxvY2stZWRpdG9yLWJsb2NrLWxpc3RfX2xheW91dHtkaXNwbGF5OmdyaWQ7Z3JpZC1yb3ctZ2FwOjI1cHg7Z3JpZC1jb2x1bW4tZ2FwOjI1cHh9LnRiLWdyaWQtaXRlbXtiYWNrZ3JvdW5kOiNkMzhhMDM7cGFkZGluZzozMHB4fS50Yi1ncmlkLWNvbHVtbntmbGV4LXdyYXA6d3JhcH0udGItZ3JpZC1jb2x1bW4+Knt3aWR0aDoxMDAlfS50Yi1ncmlkLWNvbHVtbi50Yi1ncmlkLWFsaWduLXRvcHt3aWR0aDoxMDAlO2Rpc3BsYXk6ZmxleDthbGlnbi1jb250ZW50OmZsZXgtc3RhcnR9LnRiLWdyaWQtY29sdW1uLnRiLWdyaWQtYWxpZ24tY2VudGVye3dpZHRoOjEwMCU7ZGlzcGxheTpmbGV4O2FsaWduLWNvbnRlbnQ6Y2VudGVyfS50Yi1ncmlkLWNvbHVtbi50Yi1ncmlkLWFsaWduLWJvdHRvbXt3aWR0aDoxMDAlO2Rpc3BsYXk6ZmxleDthbGlnbi1jb250ZW50OmZsZXgtZW5kfSAud3B2LXZpZXctb3V0cHV0W2RhdGEtdG9vbHNldC12aWV3cy12aWV3LWVkaXRvcj0iMjgxNGIwNjlmMTZmNDlhMjY0ZTZkNDI1NDk5ZTg1ODMiXSAgPiAudGItZ3JpZC1jb2x1bW46bnRoLW9mLXR5cGUoMW4rMSkgeyBncmlkLWNvbHVtbjogMSB9IC53cHYtdmlldy1vdXRwdXRbZGF0YS10b29sc2V0LXZpZXdzLXZpZXctZWRpdG9yPSIyODE0YjA2OWYxNmY0OWEyNjRlNmQ0MjU0OTllODU4MyJdIC5qcy13cHYtbG9vcC13cmFwcGVyID4gLnRiLWdyaWQgeyBncmlkLXRlbXBsYXRlLWNvbHVtbnM6IG1pbm1heCgwLCAxZnIpO2dyaWQtYXV0by1mbG93OiByb3cgfSAudGItY29udGFpbmVyIC50Yi1jb250YWluZXItaW5uZXJ7d2lkdGg6MTAwJTttYXJnaW46MCBhdXRvfS50Yi1jb250YWluZXIgLnRiLWNvbnRhaW5lci1pbm5lcnt3aWR0aDoxMDAlO21hcmdpbjowIGF1dG99LnRiLWNvbnRhaW5lciAudGItY29udGFpbmVyLWlubmVye3dpZHRoOjEwMCU7bWFyZ2luOjAgYXV0b30udGItY29udGFpbmVyIC50Yi1jb250YWluZXItaW5uZXJ7d2lkdGg6MTAwJTttYXJnaW46MCBhdXRvfSB9IA==
Creating groups in LabStats is the key to getting actionable usage data.
Each station in LabStats should be organized into a group. Groups are usually set up to reflect physical spaces, like computer labs and classrooms, and allow you to run reports based on location.
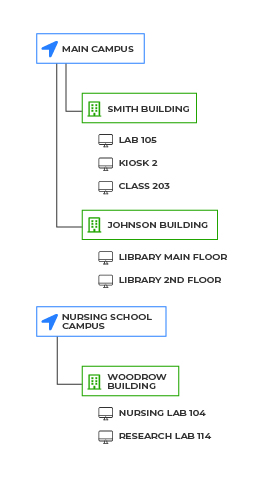
Group Hierarchy Overview You can nest groups by building names (and campus names if you have multiple campuses), which helps you stay organized and compare usage data across larger categories.
You can set up hierarchy manually and organize it in a way similar to the example below.
Example of group hierarchy Be sure to name your groups in a way that students and faculty will recognize, as those group names will be public if you utilize LabFind, LabMaps or the Remote Access Dashboard.
How to Create Groups Creating groups is easy. You can import your group hierarchy via a spreadsheet or Active Directory, or add them manually. Follow the video or get step-by-step instructions .
Watch Video (02:59) Groups with Remote Stations For remote labs, simply add “Remote” to the name of the group.
For dual-purpose labs, create two new groups—one for remote stations and one for in-person stations. These new groups should be created under a parent group that holds all the machines in one location (whether remote or not) so you have the ability to compare overall usage over time.
Groups for dual-purpose computer labs Related: Getting Groups Right Before Returning to Campus Questions? Visit our Support Site .


